Godown Wiring Diagram (3 and 4 Lamp), Tunnel and Hospital Wiring

A godown wiring diagram lights a row of lamps one at a time: as you walk, each switch lights the next lamp and puts out the one behind. We draw the 3 lamp and 4 lamp circuits with their switch-position tables, explain how tunnel wiring relates to it, and do the same for hospital wiring, where two lamps glow bright, medium or dim. Then the practical conditions, components with our MRPs, wiring steps with the MCB off, testing, mistakes and viva questions.
Key takeaways
- Godown wiring — a 1 way switch S1, then a chain of 2 way switches: each L1 feeds a lamp, each L2 the next COM.
- N lamps, N switches — one 1 way plus N − 1 two way; only one lamp can glow at a time.
- Tunnel wiring — often the same circuit; the NIMI book defines it with two lamps on and all 2 way switches.
- Hospital wiring — two equal lamps: series for dim, one lamp for medium, parallel for bright.
- ⚠ MCB off, tester on. A neon tester does not prove a circuit dead; confirm with a meter.
Godown wiring diagram: the short answer
A godown wiring diagram shows a row of lamps switched one after another, so that a person walking through a long store room lights the next lamp and puts out the one behind with a single switch. For three lamps it uses one 1 way switch at the entrance and two 2 way switches, chained together in the phase.
It is a standard practical of the ITI Electrician trade, taught alongside staircase, corridor and hospital wiring.
We make the switches, holders, MCBs and line testers used on these boards at our works in Marol, Andheri East, Mumbai; every MRP below is from our current catalogue. Practise under your instructor; wiring in a building is a job for a licensed electrician.
Godown wiring vs tunnel wiring: is it the same circuit?
In most ITI practical files, classroom notes and videos, godown wiring and tunnel wiring mean exactly the same circuit: lamps lit one at a time as you walk, each switch lighting the lamp ahead and putting out the lamp behind. The NIMI theory book used in ITIs separates them: godown wiring keeps one lamp on, tunnel wiring keeps at least two on, because a tunnel is darker.
So read the job sheet first. Godown wiring one lamp glows at a time and the others are off. Tunnel wiring (NIMI) at least two lamps glow while you move, and every switch is a 2 way switch. Corridor wiring and hostel wiring sit in the same lesson but are different circuits.
If the 2 way switch and its COM, L1 and L2 terminals are new to you, read our 2 way switch wiring diagram for the staircase circuit first. Here the 2 way switch is a changeover: its COM goes either to a lamp or on to the next switch.
If your practical is called tunnel wiring, ask your instructor which version is meant: one lamp at a time, or two. This guide draws the one-lamp version, which is what most institutes set under both names.
| S1 | S2 | S3 | S4 | Lamp that glows |
|---|---|---|---|---|
| OFF | Any | Any | Any | None |
| ON | L1 | Any | Any | Lamp 1 |
| ON | L2 | L1 | Any | Lamp 2 |
| ON | L2 | L2 | L1 | Lamp 3 |
| ON | L2 | L2 | L2 | Lamp 4 |
Godown wiring diagram 3 lamp: how the circuit works
In a 3 lamp godown wiring diagram the phase goes through the 1 way switch S1 to COM of the 2 way switch S2; L1 of S2 feeds lamp 1 and L2 of S2 feeds COM of S3; L1 of S3 feeds lamp 2 and L2 of S3 feeds lamp 3, while the neutral goes straight to all three lamps.
Godown wiring diagram, 3 lamps: one 1 way and two 2 way switches
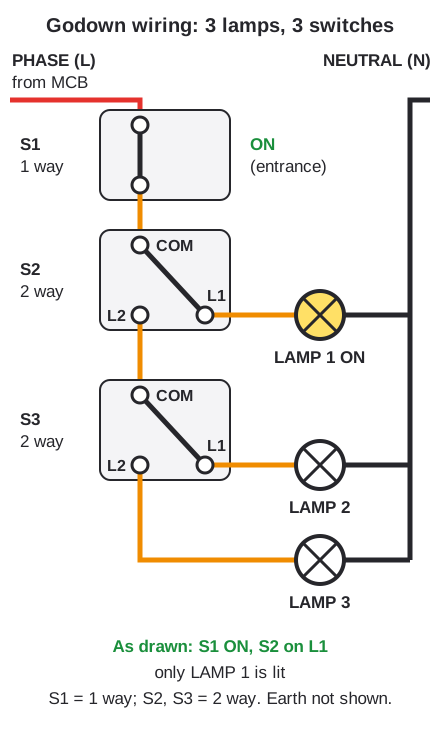
Drawn by us. As drawn, S1 is on and S2 sits on L1, so only lamp 1 glows. Earth is not shown; it goes to any metal box or fitting. Wire colours vary; a tester confirms which wire is which. Tap the diagram to open it full size.
| S1 (1 way) | S2 | S3 | Lamp 1 | Lamp 2 | Lamp 3 |
|---|---|---|---|---|---|
| OFF | Any | Any | Off | Off | Off |
| ON | L1 | Any | ON | Off | Off |
| ON | L2 | L1 | Off | ON | Off |
| ON | L2 | L2 | Off | Off | ON |
Walk in: S1 on at the door lights lamp 1. At lamp 1, flip S2 to L2: lamp 1 goes out and lamp 2 lights. At lamp 2, flip S3 to L2: lamp 2 goes out and lamp 3 lights. There is only one path from the phase to any lamp, so one lamp at a time is built into the wiring. Some books write the 2 way positions as OFF and ON instead of L1 and L2.
Every switch sits in the phase and the neutral is never switched. With S1 off, every lamp holder in the godown is dead.
Every switch breaks the phase; the neutral goes straight to each lamp.
The chain has one path, so lighting the next lamp puts out the last.
One 1 way switch at the door, then one 2 way switch per extra lamp.
Test every row of the position chart, walking in and walking out.
Godown wiring diagram 4 lamp: adding a lamp
To wire four lamps, add one more 2 way switch to the chain: L2 of S3 now goes to COM of a new switch S4 instead of to a lamp, L1 of S4 feeds lamp 3 and L2 of S4 feeds lamp 4, so four lamps need one 1 way switch and three 2 way switches.
Godown wiring diagram, 4 lamps: one 1 way and three 2 way switches
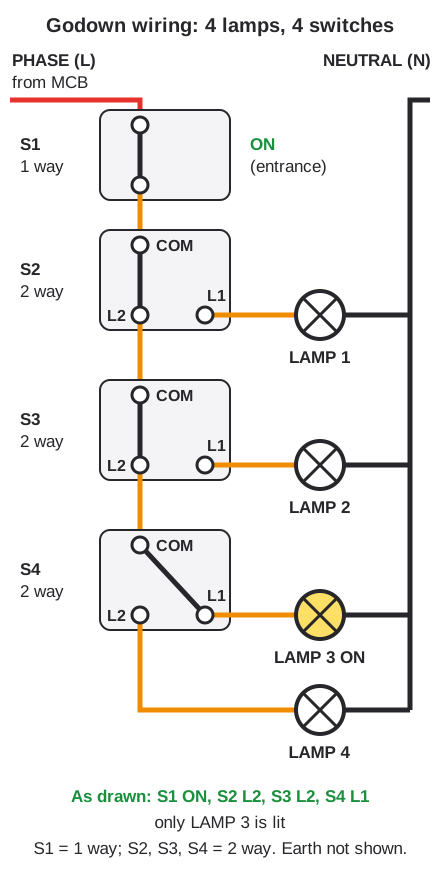
Drawn by us. As drawn, S2 and S3 sit on L2 and S4 on L1, so only lamp 3 glows: the walker is in the third section. Wire colours vary; a tester confirms which wire is which. Tap the diagram to open it full size.
The rule for any length: N lamps need N switches, that is one 1 way switch at the entrance and N − 1 2 way switches, each fixed where its lamp section ends.
Walking out runs the chart backwards. At the far end, flip S4 back to L1: lamp 4 goes out and lamp 3 lights. Flip S3 back at lamp 3, then S2 at lamp 2, and finally switch S1 off at the door, which puts out everything whatever the other switches show.
What conditions must godown wiring meet?
A godown wiring practical is passed when the circuit meets five conditions: only one lamp glows at a time, each switch lights the next lamp and puts out the one behind, the sequence reverses on the way out, S1 puts out everything, and every switch breaks the phase, never the neutral.
- One lamp only: no switch position may light two lamps together.
- Forward step: one flip lights the lamp ahead and puts out the lamp behind.
- Return step: the same switches, flipped back in reverse order, light the way out.
- Master off: S1 at the entrance cuts the whole chain.
- Phase only: switches in the phase; the neutral runs to every holder unbroken.
Examiners also check tight terminals, the earth at any metal box, and that on a screw-type holder the switched phase goes to the centre contact.
A godown circuit wired with the switches in the neutral still passes the lamp test, which is why examiners check it with a tester. Every holder must be dead when its lamp is off.
Tunnel wiring theory: when two lamps stay on
Tunnel wiring, as the NIMI theory book defines it, is the version of the circuit in which at least two lamps stay on while a person moves through, so that he lights the lamps ahead and puts out a lamp behind with one switch; all its switches are 2 way switches.
The book attaches a caution to that circuit: it is not in accordance with the IE rules, because the phase and the neutral come to the same switch, so it must be wired with care. We do not draw that version here; if your job sheet asks for it, follow your instructor’s drawing.
For the one-lamp version, the godown diagrams above apply unchanged. In Hindi classrooms the rule is often said as “aage ki batti jalao, peeche ki bujhao”: light the lamp ahead, put out the lamp behind.
A circuit that brings phase and neutral to one switch shorts them if a wire lands on the wrong terminal. Prove it with a meter, supply off, first.
Hospital wiring diagram: bright, medium and dim
Hospital wiring is the ITI practical in which two lamps are controlled by a 1 way switch and a 2 way switch so that a ward can have full light for the doctor, medium light, or a dim night light: wired in series both lamps glow dim, and in parallel both glow bright.
Hospital wiring diagram: two lamps, a 1 way and a 2 way switch
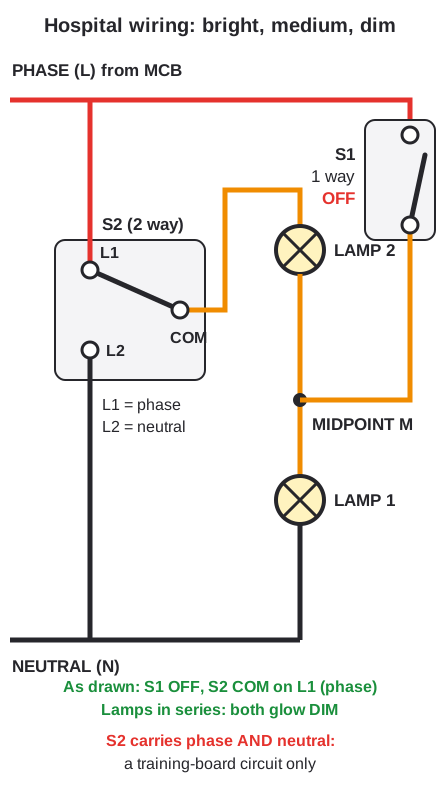
Drawn by us. As drawn, S1 is off and S2 is on phase, so the two lamps are in series and both glow dim. Wire colours vary; a tester confirms which wire is which. Tap the diagram to open it full size.
The connections: lamp 1 runs from the neutral to a midpoint M, lamp 2 from M to COM of S2. L1 of S2 takes the phase and L2 takes the neutral. S1 joins the phase to M.
| S1 (1 way) | S2 COM on | Lamp 1 | Lamp 2 | Ward light |
|---|---|---|---|---|
| OFF | L2 (neutral) | Off | Off | None |
| OFF | L1 (phase) | Dim | Dim | Dim: lamps in series |
| ON | L1 (phase) | Bright | Off | Medium: one lamp |
| ON | L2 (neutral) | Bright | Bright | Bright: lamps in parallel |
Why dim? In series two equal lamps share the 230 V supply, so each gets about half and glows dim. With S1 on, M is at phase, so lamp 1 always gets the full supply and glows bright.
What are the hospital wiring conditions?
The hospital wiring practical must give four states from two switches: off, dim with both lamps in series, medium with one lamp, and bright with both lamps in parallel, using two lamps of the same wattage, with no switch position that joins the phase straight to the neutral.
Same wattage: with unequal lamps the voltage splits unequally in series, and one lamp glows while the other barely shows. Filament lamps: the practical is set with ordinary filament lamps, because an LED lamp has a driver inside and two in series do not share the voltage predictably; the dim step may flicker or stay dark. Phase and neutral in S2: as with NIMI’s tunnel circuit, treat it as a training-board circuit. In the medium position lamp 2 is off but both its terminals sit at phase, so never change a lamp on this board with the MCB on.
For a hospital wiring diagram 3 lamp version the principle holds (series dim, full supply bright), but the switch arrangement changes, so follow your instructor’s drawing. A nurse-call bell is a separate circuit; for that we make the VIZA V1290 hospital bell indicator, ₹282 MRP.
Before the supply goes on, check with a meter on continuity that no position of S2, with S1 on or off, gives a direct path from phase to neutral.
Components list for godown and hospital wiring practicals
A 3 lamp godown board needs one 1 way switch, two 2 way switches, three lamp holders and lamps, an MCB, wire and a tester; a 4 lamp board adds one 2 way switch and one holder; a hospital board needs one 1 way switch, one 2 way switch and two holders with lamps of the same wattage.
Switches: on a conventional training board, our VIYONA 101 1 way switch is ₹22 and the VIYONA 102 2 way switch ₹36 MRP, both from the VIYONA 6 A Deluxe range. In modular form, the KEMPS K101 10AX 1 way switch is ₹65 and the KEMPS K102 10AX 2 way ₹105.
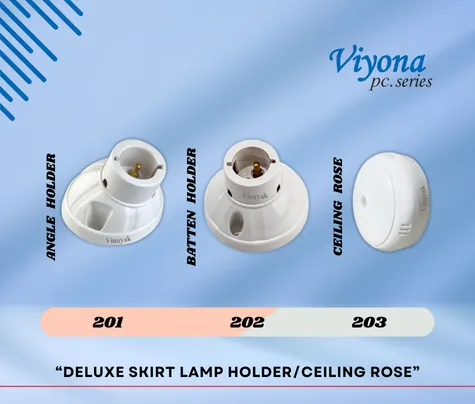
Holders: the VIYONA 202 batten holder and 201 angle holder are ₹26 each in our Deluxe skirt holder range. MCB: the VIYONA 401 single pole MCB, 6 to 32 A, is ₹145 in our 10kA MCB range; how an MCB trips is a guide of its own. Wire: 1.5 sq mm is common practice for lighting, such as our VIYONA house wire. Add a screwdriver, stripper, tape and a multimeter.
MRP of 1 way and 2 way switches across our ranges
MRPs from our current catalogue, white or standard finish; bar length is proportional to MRP with ₹105 as the full bar.
Godown wiring practical: step-by-step wiring with the MCB off
Wire the board in a fixed order: isolate and prove dead, mount the parts, run the phase chain through the switches, run the neutral to every holder, then check continuity before any supply is connected.
- Isolate. MCB off, and prove the board dead with a multimeter or voltage tester; a neon tester alone does not prove dead.
- Lay out. Mark S1 at the entrance end, then S2, S3 and so on beside lamps 1, 2 and 3. Fix boxes and holders.
- Phase in. From the MCB to S1 only. S1’s other terminal to COM of S2.
- Chain. L1 of each 2 way switch to its lamp; L2 to the next COM. On the last switch, L2 goes to the last lamp.
- Neutral. Loop the neutral to the second terminal of every holder, never through a switch.
- Earth. To any metal box or fitting.
- Check dead. With a meter on continuity, step through the position table and confirm one lamp path per row.
- Power. Only with your instructor present, MCB on, then walk the table in and out.
Never alter a wire with the MCB on, even on a training board. Switch off, prove dead, then change it.
How do you test godown and hospital wiring?
Test with the supply off first: use a multimeter on continuity to check each switch position against the table and confirm that no position joins phase to neutral, then switch on the MCB with your instructor present and walk through every row of the switch-position chart.
With power on, a line tester shows where the phase is: in godown wiring each holder should show no glow when its lamp is off (in hospital wiring, the unlit lamp in the medium position is still at phase). We make the VIYONA line tester 811 (code 198) at ₹36 and 812 (code 199) at ₹42 MRP. A neon tester only shows that a phase is present, so no glow is not proof of dead; confirm with a meter.
Many institutes also use a series test board before the first switch-on; follow your instructor’s method. For hospital wiring, look for equal dim glow in the series position: unequal glow means unequal wattages or a loose joint.
Never test by touching wires or by looking for a spark. If a result is unclear, switch off and ask.
Common mistakes in godown, tunnel and hospital wiring
Most failures in these practicals come from five mistakes, and the switch-position table finds four of them.
COM on L1 or L2: the chain wire lands on a switched terminal, so two lamps light together or a lamp never lights. Switches in the neutral: the lamps still change, but every holder stays live. Last switch wrong: L2 of the last switch left empty, so the last lamp never lights. Unequal lamps in hospital wiring: the dim step looks like one lamp on. Loose terminal: flicker and heat at a switch.
The rule behind the first two, phase to the switch and neutral to the load, is explained in our phase, neutral and earth guide; our switch board wiring diagram draws a full board, and 1 way vs 2 way switch shows how to tell the switches apart.
Label COM, L1 and L2 on each 2 way switch with a pen before you mount it. Markings differ between makers, so read the switch body rather than guessing from where a screw sits.
Viva questions on godown and hospital wiring
Questions examiners often ask after the practical, with short answers to put in your own words.
Why is S1 a 1 way switch? It only connects or cuts the phase to the whole chain; a 2 way switch with one terminal unused also works. How many switches for N lamps? N: one 1 way and N − 1 two way. Why can only one lamp glow? The chain gives one path from phase to lamp.
Why do lamps in series glow dim? Two equal lamps share 230 V, about 115 V each. Which hospital position gives medium light? S1 on, S2 on phase. Why must the switch be in the phase? So the holder is dead when the lamp is off. Does a neon tester prove a circuit dead? No; use a meter.
FAQs
Godown wiring kya hai?
Tunnel wiring kaise kare?
How many switches are used in godown wiring for 4 lamps?
What is the difference between godown wiring and tunnel wiring?
Hospital wiring mein light dim kaise hoti hai?
Can I use LED bulbs for the hospital wiring practical?
Why buyers choose Vinayak Electricals
- 1 way and 2 way switches in all three ranges: VIYONA 101 (₹22) and 102 (₹36), KEMPS K101 (₹65) and K102 (₹105), VIZA V101 (₹56) and V102 (₹81).
- Lamp holders for practice boards from ₹26, such as the VIYONA 201 angle and 202 batten holders.
- VIYONA line testers 811 (₹36) and 812 (₹42) for finding the phase.
- VIYONA 10kA MCBs, from ₹145 for a single pole 6 to 32 A, made under licence CM/L-2544151.
- Made at our works in Marol, Andheri East, Mumbai, since 1995; ISO 9001:2015 certified.
- MRPs published openly in our catalogue, with all-India delivery through our dealers.
Switches and holders for every practice board
See the VIYONA range of 1 way and 2 way switches, holders and testers, then order through a dealer or by phone.
View VIYONA switches