Bulb Holder Connection, Step by Step: Batten, Angle, Pendant
A bulb holder connection is two wires under two screws: the phase that comes through the wall switch and the neutral that comes straight from the board. Getting it right is simple, but getting it safe means the switch must be in the phase, the terminals must be tight and the work must be done with the MCB off. Below we go step by step through batten, angle and pendant holder wiring, changing an old holder, connecting two holders to one switch, and the faults that make holders spark or heat, using the holders we make in Mumbai as examples.
Key takeaways
- Two wires — switched phase from the wall switch, neutral direct from the board. Plastic holders have no earth terminal.
- Switch in the phase — so the holder is dead when the switch is off. On a screw holder, phase to the centre contact.
- MCB off and tested dead — before you touch any terminal. A switch alone is not enough.
- Tight terminals, no loose strands — a loose screw is where holders heat and spark.
- Our holders — VIYONA angle and batten holders from ₹26 MRP; 2-in-1 holders ₹52 and ₹55.
Bulb holder connection: the short answer
Every ordinary bulb holder, whether batten, angle or pendant, has two terminals. One takes the phase wire that has passed through the wall switch. The other takes the neutral wire, which runs straight from the distribution board without passing through any switch. When the switch is off, the phase is broken and the holder is dead.
That is the whole circuit. The skill is in the details: the switch must break the phase, not the neutral; each conductor must sit fully under its terminal screw; no stray strand should reach the other terminal; and the base must be fixed firmly so the cable is not pulled every time a lamp is changed.
This guide is for a homeowner replacing a like-for-like holder, and for anyone who wants to check an electrician’s work. A new light point, a new cable run or anything in a wet area is a job for a licensed electrician. Which holder type suits which spot is covered in our electric holder types guide, so here we stay with the wiring.
What do you need before connecting a bulb holder?
Before connecting a bulb holder you need the circuit switched off at the MCB, a tester to confirm the wires are dead, a small flat or Phillips screwdriver that fits the terminal screws, a wire stripper or sharp knife, insulation tape, and the new holder with its screws and any wall plugs.
The tools are cheap; the order matters more. 1. MCB off Switch off the MCB that feeds the lighting circuit, or the main switch if you are unsure which one it is. 2. Test dead Check both wires at the holder with a tester. 3. Then work
A neon line tester shows that a phase is present, but it never proves a wire dead: a faint or failed neon can mislead. Use a proper voltage tester or ask an electrician if you are not sure. Our guide on how to use a line tester explains its limits.
Keep insulation tape for any old joint you find in the ceiling, and a torch, because the room light is the one you are working on.
Never work on a holder with the supply on, even to “just tighten a screw”. Switch off the MCB and confirm the circuit is dead first.
| Holder | Wires | Where the phase goes | Earth terminal | Our example |
|---|---|---|---|---|
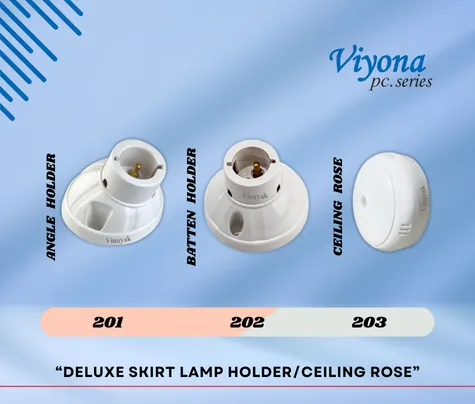
| Batten holder | Phase via switch, neutral | Either terminal (B22) | No (plastic body) | 202 Deluxe, ₹26 |
| Angle holder | Phase via switch, neutral | Either terminal (B22) | No (plastic body) | 201 Deluxe, ₹26 |
| 2-in-1 holder | Phase via switch, neutral | Either terminal (B22) | No (plastic body) | 219, ₹52 |
| Pendant holder | Two cores of flex | Either core (B22) | No (plastic body) | 227 skirt pendant, ₹27 |
| Any E27 screw holder | Phase via switch, neutral | Centre contact only | No (plastic body) | Check cap with dealer |
How to connect a batten holder, step by step?
To connect a batten holder, switch off the MCB, test the wires dead, feed the phase and neutral through the hole in the base, strip about a centimetre of each, clamp one under each terminal screw, fix the base flat to the ceiling or block with two screws, then fit the cover and test with a lamp.
Step by step:
1 Unscrew the cover of the new holder to expose the two terminals. 2 Pull the cable through the centre hole of the base, never over its edge. 3 Strip only enough insulation for the copper to sit fully under the screw: no bare copper should show outside it. 4 Twist stranded wire tight, or fold it back on itself, so no loose strands remain. 5 Clamp one wire under each terminal and tighten firmly. 6 Screw the base flat to the surface with both fixing screws. 7 Refit the cover, fit the lamp, then switch the MCB on and test.
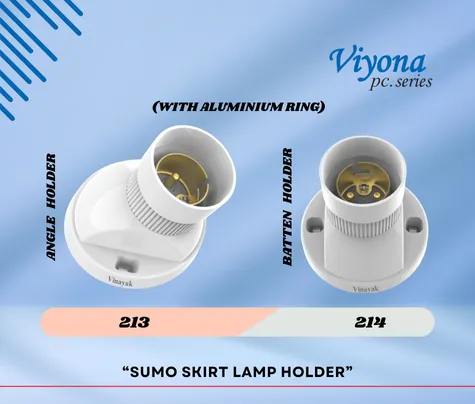
Our Deluxe 202 batten holder is ₹26 MRP; the Sumo 214 with an aluminium ring is ₹30.
Tug each wire gently after tightening. A conductor that slides out was under the screw head, not under the clamp.
Switch off the circuit and test it dead before touching a terminal.
So the holder is dead whenever the switch is off.
Copper fully under the clamp; tug-test every wire.
On a pendant, the cord grip takes the weight, not the screws.
How is an angle holder wired?
An angle holder is wired exactly like a batten holder, with the switched phase under one terminal and the neutral under the other; the only difference is mounting, because the base fixes to a wall, usually over a round block or a box, and the cable normally comes out of the wall behind it.
Points that differ on a wall: the cable often comes from a wall box or round block, so leave a little slack inside the block, not stretched tight to the terminal. Fit the holder so the lamp tilts forward and down, and so the cable entry is at the back, not along the side.
Above a mirror or a basin, keep the holder clear of splashes. An indoor holder is not a weatherproof fitting; on an outside wall, fit it under a projection.
MRP of our angle holders, by family
MRPs from our current catalogue, bars to scale with ₹65 as the full bar. Every angle holder has a batten twin at the same MRP.
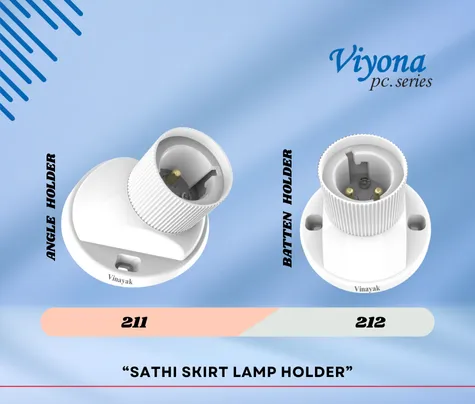
Our angle holders wire identically across families; the Sathi 211 at ₹28 is a plain skirt body, and the Decent and Sumo add an aluminium ring. A 2-in-1 holder, the 219 or 220, can be set either way and wires the same.
Which wire goes where in a bulb holder?
In a bulb holder the phase wire that comes from the switch goes to one terminal and the neutral wire goes to the other; on a bayonet B22 holder either terminal can take the phase, but on a screw-type E27 holder the switched phase must go to the centre contact and the neutral to the threaded shell.
Indian wiring commonly uses red for phase and black for neutral in older homes, and brown for phase and blue for neutral in newer ones. Do not rely on colour alone, because a switch drop is sometimes run in whatever wire was to hand. Our phase, neutral and earth guide explains the colour codes.
Tracing it is simple: the wire that goes dead when the switch is off is the switched phase. The other one is the neutral, and it stays at neutral whatever the switch does.
B22 either terminal takes the phase. E27 the centre contact takes the switched phase and the thread the neutral. Never both conductors under one terminal.
The cap difference itself is covered in B22 vs E27.
Does a bulb holder need an earth wire?
An ordinary plastic bulb holder does not need an earth wire and has no earth terminal, because its polycarbonate body does not conduct; a holder or light fitting with an exposed metal body, such as an old brass holder or a metal lamp shade, does need earthing so a fault cannot make the metal live.
All our holders are polycarbonate bodies with two terminals, and the aluminium ring on some families is a reinforcement at the mouth, not an exposed earthable body. Where an old brass holder with no earth wire is still in use, replacing it with a plastic holder is the simple fix.
If the point has an earth wire (green, or green and yellow) that the holder does not need, do not cut it short or leave it bare. Tape its end and fold it back into the box, so it is ready for a metal fitting later.
Earthing matters far more at sockets and metal-bodied appliances; our types of earthing guide explains how a home is earthed.
Never connect an earth wire to the neutral terminal of a holder, and never use the earth as a neutral. If a point has no neutral, call an electrician.
How to change a bulb holder?
To change a bulb holder, switch off the MCB and test the old holder dead, unscrew its cover, note which wire goes to which terminal, loosen both screws and take the wires out, cut back any blackened or brittle insulation, then fit the new holder exactly as the old one was wired.
When to change one: a cracked or brown body, a burnt smell, a lamp that flickers when touched, or plungers that no longer spring back. Our home electrical maintenance checklist puts holders on the yearly list.
While the old holder is off, check three things. Wire ends If the copper is darkened or the insulation hard and cracked, cut back to clean wire. Wire length If cutting back leaves too little to reach, an electrician should add a proper joint in a box, not a taped twist in the ceiling. The switch If the old holder stayed live with the switch off, the switch is in the neutral and needs correcting.
Fit the same type and cap as before, unless you are deliberately changing it. A box of 20 means spares for every point in a flat.
How do you connect two bulb holders to one switch?
To run two bulb holders from one switch, connect them in parallel: loop the switched phase from the first holder’s terminal to the second holder, and loop the neutral the same way, so each lamp gets full voltage and one failing does not put out the other.
Wiring them in series, one wire through both lamps, is a common mistake: both lamps glow dimly, and an LED lamp may flicker or not light at all. Every lighting point in a home is a parallel connection.
Looping at a holder terminal means two conductors under one screw. Twist them together first and tighten firmly; if they will not both sit under the clamp, use a connector in a box instead.
Two switches controlling one light, such as at the top and bottom of a staircase, is a different circuit, drawn in our 2 way switch wiring diagram. How the switches, sockets and indicator sit on the board is in our switch board wiring diagram.
Check the switch rating against the total load. Two LED lamps are a tiny load for a 6A switch; a row of old halogen lamps is not.
How to connect a pendant holder?
A pendant holder is connected to a length of flexible cord at its top terminals, with the cord clamped in the holder’s cord grip, and the other end of the cord is connected to the flex terminals of a ceiling rose, so the cord grips, not the terminal screws, carry the weight of the holder and shade.
The detail that matters is the cord grip. Thread the flex through the cap of the holder, tie or clamp it in the grip, and only then take the two cores to the terminals, so a pull on the lamp never reaches the screws. Use flexible cord, not solid house wire, for any drop.
Hang only a light shade from a pendant holder. A heavy glass fitting needs its own hook in the slab.
Our pendant holders are the 229 black skirt at ₹24, the 227 skirt pendant at ₹27 and the 226 multi pendant at ₹34; see the pendant lamp holder page. The rose end of the job is in our ceiling rose guide.
Why does a bulb holder spark or get hot?
A bulb holder usually sparks or gets hot because of a loose terminal screw, a stray strand touching the other terminal, worn plungers that no longer press firmly on the lamp, or an old filament lamp of too high a wattage cooking a small holder; all of them are fixed by switching off and replacing or remaking the joint.
Read the signs: crackle or smell means a poor contact heating now; flicker when the lamp is touched means weak plungers or a loose cap; browned plastic means it has been running hot for a while. A flicker that has nothing to do with the holder, from the lamp’s driver or the switch, is covered in our LED light flickering guide.
LED lamps help: a 9W LED lamp produces far less heat at the cap than the 60W filament bulb it replaces, so the holder runs cooler for years.
If the MCB trips when the lamp is switched on, there is a short at the holder or in the cable. Leave it off and call an electrician; our guide to short circuits at home explains why.
A holder that has sparked once will spark again. Switch off the MCB and replace it; do not just tighten and hope.
What does a basic light point cost at MRP?
A basic light point built from our range costs ₹118 at MRP for the parts you see: a 6A one-way switch (101, ₹22), a batten holder (202, ₹26) and a 9W LED lamp (1065, ₹70), with the wire, conduit, box and labour on top and set by your electrician.
Parts of one light point at MRP
MRPs from our current catalogue, bars to scale with ₹70 as the full bar. Wire, conduit, box and labour are not included.
Swap in the Royal fancy 218 at ₹38 or the square 222 at ₹65 and the total rises to ₹130 or ₹157. The holder is the cheapest part of the point; it is not the place to save money with an unknown brand.
The switch shown is from our VIYONA 6A deluxe switch range. LED lamps from 9W to 50W are on our LED lights page.
FAQs
How do you connect a bulb holder?
Which wire goes to the centre of a bulb holder?
Does a bulb holder need an earth wire?
Why is my bulb holder live when the switch is off?
How do I connect two bulb holders to one switch?
What is the price of a batten holder?
Why buyers choose Vinayak Electricals
- Angle, batten, 2-in-1 and pendant holders made in-house at our works in Marol, Andheri East, Mumbai.
- Polycarbonate bodies, with an aluminium ring at the mouth on the Decent, Sumo, Royal and square families.
- Every angle holder has a batten twin at the same MRP, from ₹26.
- Switches, holders and LED lamps for a whole light point from one catalogue.
- MRPs published openly; sold through 500+ dealers with delivery across India.
- Manufacturing in Mumbai since 1995; ISO 9001:2015 certified.
Holders for every light point
See our VIYONA angle, batten, 2-in-1 and pendant holders with codes and MRPs, then order through a dealer or call us.
View lamp holders